Presenters
- Enrique Francis - Techspray Field Engineer
- Jon Urquhart - PVA Director of Global Applications Engineering,
- Kevin Pawlowski - Techspray Marketing Communications Manager
Table of Contents
- Conformal Coating Overview
- How to Define a Defect?
- Main Types of Coating Defects
- Common Defect: Dewetting
- Common Defect: Delamination
- Common Defect: Non-Uniformity
- Common Defect: Voids or Bubbles
- Common Defect: Cracks
- Common Defect: Orange Peel / Ripples
- Defect Prevention: Equipment
- Defect Prevention: Nozzle Selection
- Defect Prevention: Keep-out Areas
- Defect Prevention: Coating Prep
- Defect Prevention: Thickness Check
- Defect Prevention: Curing Process
- Cleaning PCB Before Coating
Kevin Pawlowski:
Welcome to our new webinar, Conformal Coating Defects: How to Diagnose, Repair, and Prevent. Okay, and I'm your moderator, Kevin Pawlowski. I'm marketing communications manager over at ITW Contamination Control, long name. But by the brands you know, you're generally going to know us by Chemtronics or Techspray. And today, we're going to mostly be talking about Techspray.
Also with us, we've got Enrique Francis. He is the field engineer with Chemtronics and Techspray. So, if you guys are using our products or you're qualifying our products, he's your new best friend. He's going to be working with you directly either in the lab running your samples or he's going to fly out and meet you in the field, meet you at your facility and get you up and running. So, right here, you've got his contact information. Of course, we'll be providing that as well, and his phone number.
Now also with us, Jon Urquhart. He's the director of Global Applications Engineer at PVA. Now, PVA is a top name in the actual equipment to apply the conformal coating.
So, with you today, we've got two experts, one on the chemical side and the other on the equipment side. And so, the name of the game is we're going to give you everything we can in terms of identifying and preventing defects either from the chemical side or from the equipment side.
Conformal Coating Overview
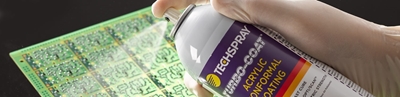
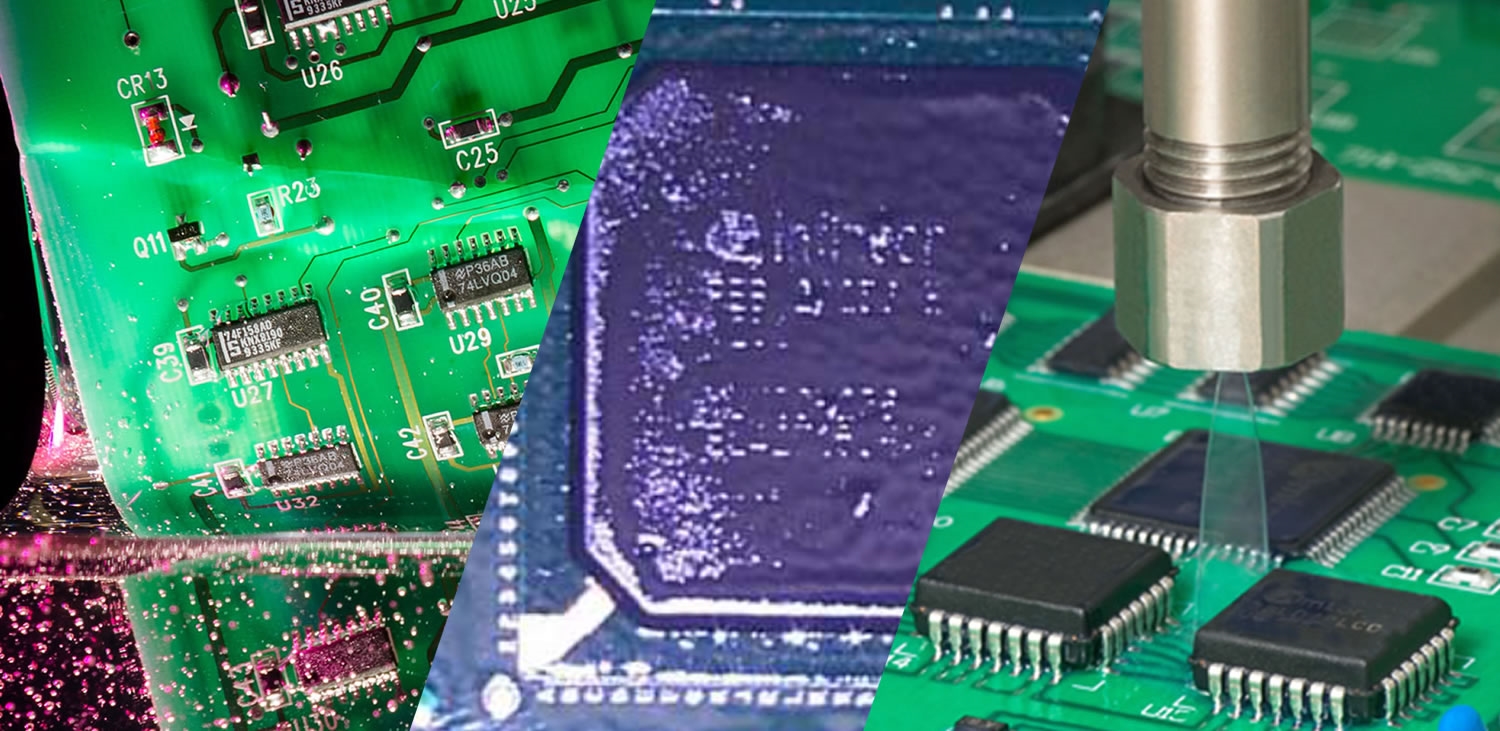
So, with that, I will take us to the first slide and I'll cover this just to give you an idea of what a conformal coating is.
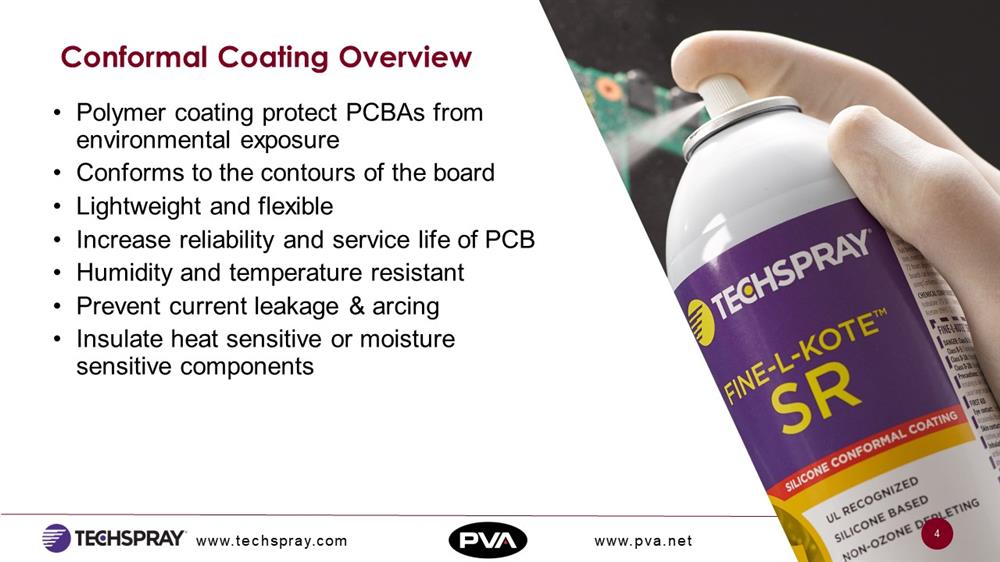
You can think of it as a shellac for a circuit board. Like any shellac, you would apply to wood furniture. It's to protect from the environment. Now, I don't want to say it's exactly like a shellac because there are companies out there buying from Home Depot and using for conformal coating. We don't recommend that. These are specialized chemicals tested for circuit boards. We work hard to make sure they're good for those applications. There's qualification testing we go through, whether it's IPC CC-830B or whether it's MIL spec, whether it's UL to prove it's good for its purpose. So, it is specialized for that.
Now, the reason we call it conformal coating because it conforms to the contours of the board. It's lightweight, flexible. Its job is to increase the reliability of the circuit board. And it's doing that by preventing contamination and problems from the outside environment and also problems from the board itself, whether it be cycling, thermal cycling, whether that be arcing, things of that nature. It could be helping with humidity, temperature resistant, could be preventing current leakage and arcing. It could be insulating heat sensitive or moisture or sensitive components. Okay. So, it's a coating that does all of that.
How to Define a Defect?
Enrique Francis:
Well, let's take a look at some of the defects you have. Just remember that coating failures in itself, they lead to extra costs for the manufacturer or the worst part of it all, it could actually lead to project delays. Mostly what you'll find is that we're going to try to identify these types of common defects and then try to give you a possibility of how to solve them.
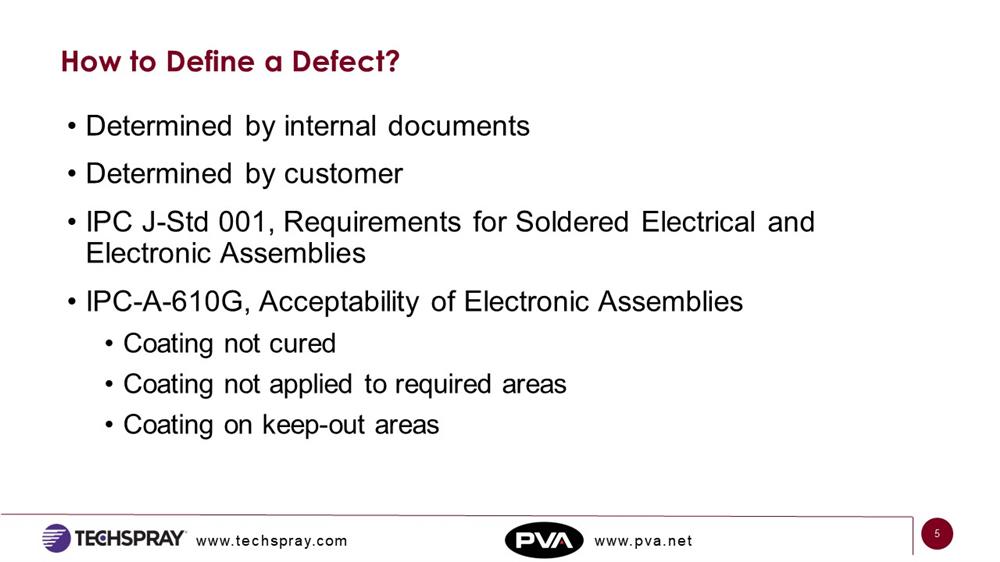
Conformal coating is applied in a number of different ways. You can obviously spray it. You can brush it. You can dip the actual PC board into the coating itself and then pull it out and that'll apply it. The manufacturers have industry-specific guides that will help them. In particular, you have the IPC-J-STD-001. That's one of them for, again, for electrical assemblies in itself.
The second one in particular, you have the IPC-A-610 G, which is mostly orientated to identify specific defects in itself. Like for example, coating that isn't cured on a board. That could give you tremendous amount of issues. Another one in particular would be applying the coating itself to an area that isn't really needing to have a coating on it or applying coating in areas that are kept specifically covered. Those are basic defects. But again, they can lead to problems down the road.
Kevin Pawlowski:
Right, and I think, let me just hit that first point, first two points, is there's all kinds of industry standards out there, but first and foremost, the standards are set by the user or by the customer, by whether that be the contract manufacturer or their customer. They're going to set what is required for a coating. So, what's a defect for one might not be a defect for another. There's not universal rule for this, but there's certainly defects that are common.
But give you an example, a defect of an opening, a via in the coating in a piece of bare board that has nothing around it, it may not cause any problems. So, some customers, that's fine. Some customers that's a serious defect. Or a process indicator of a problem. So, there's different requirements for this, but it largely is set by the customer themselves.
Main Types of Coating Defects
Enrique Francis:
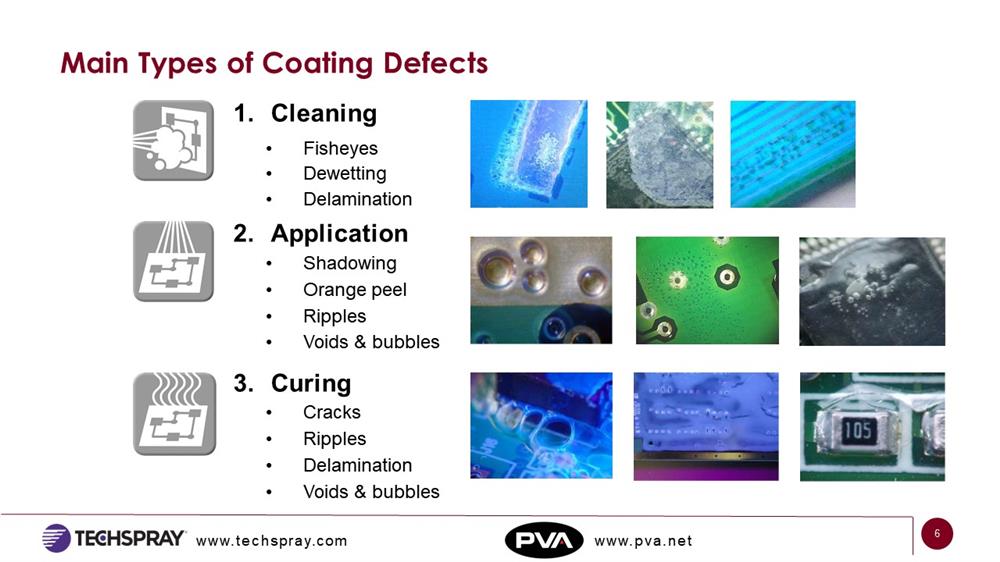
What we have here is we have multiple causes and multiple effects that can be created in coating in itself. For example, you have to the left of the screen, you will find some icons that are going to relate to the specific application or whether the board has not been cleaned properly or whether it's a curing issue.
What you'll find in particular is that if, for example, in the first icon, it speaks towards cleaning the board prior to applying the coating. Well, that is very vital because as we have mentioned earlier, coatings will completely coat the surface of the board and it will literally entrap whatever may be on that board if it's not properly clean.
In an applicational sense, you can get, for example, thicker edges or you can get an orange peel effect where the coating has ripples within it. Again, that's an applicational issue that can be looked at. And you can work your way backwards from there where you can adjust of the proper distance from the applicator to the actual board minimizing those effects.
And finally, the icon on the left, the last one, that's pertaining mostly to curing and the curing issues that can occur by either an over-coating where you can create cracks within the actual coating itself. I already mentioned ripples, but again, rippling can also occur by speeding up the actual curing aspect of it, the lamination, which is something that happens when it pulls away from the surface of the board itself, and of course, voids and bubbles.
Kevin Pawlowski:
So, we're going to be breaking up some of these different defects specifically and talking about them point by point. And one of the advantages of breaking it up by the different classifications is it helps you diagnose the problem, helps you narrow it down, and so you can do some A/B testing or some type of testing to see if you can eliminate the problem.
For example, cleaning. If you suspect it's cleaning problem, take the circuit board, clean the heck out of it, then coat it. If the problem goes away, then you can tweak your process accordingly. So, it's just a way to help diagnose and solve the problem. These little icons, there's mix and match here. So, these icons are used throughout and you'll see them in the ideas. So, as we're talking about it, you can kind of keep those classifications in mind.
Common Defect: Dewetting
Enrique Francis:
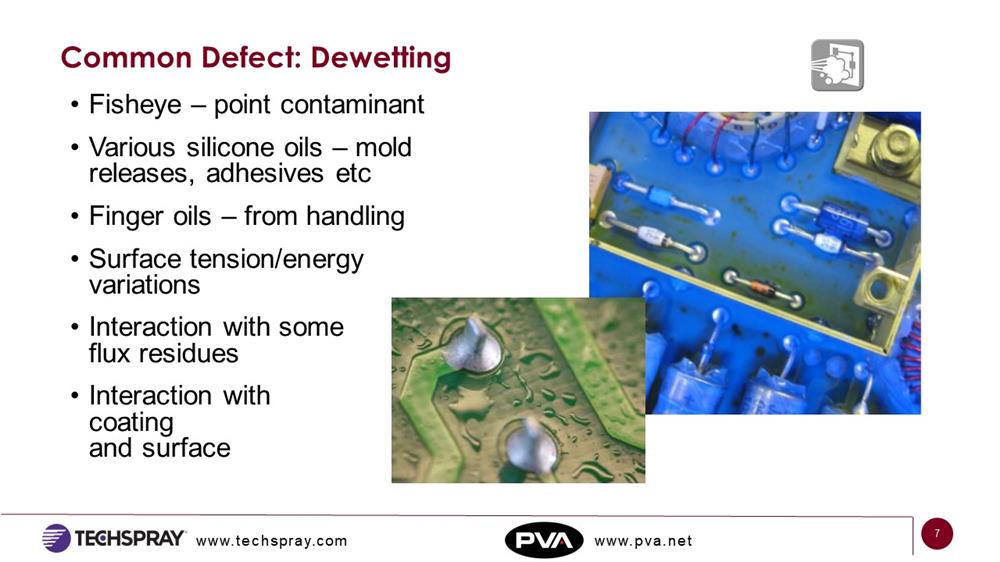
Let's take the first defect, de-wetting in itself. De-wetting is truly where the coating has not completely covered the surface of the board itself, where the substrate actual may have contaminants on them. One that's very noticeable and most people tend to look at it is fish eyeing.
Fish eyeing is where the coating actually has a contaminant underneath it where it could be something like an oil or a mold release or even adhesive. It could be just finger oils from handling the actual board by the operator that may have not been wearing gloves. That can create a de-wetting aspect of it.
Another area that can occur or another defect that can occur is surface tension. Surface tension is actually where you find the surface may have had something on it that is causing the coating to be pushed away from the actual area that you're trying to apply it. This is an issue that can be remedied quite simply by washing the board properly or maybe taking and backing away a little bit on the pressure that you're utilizing to apply the coating onto it itself.
Some fluxes also, or not some fluxes, but every flux can create some type of an interaction problem as well. Here, the washing specifically of those boards and the removal of the fluxes will allow you to coat properly and give you a more, even coating. Inner coat issues between layers can give you issues that swell where again, where one layer isn't always cured properly or maybe that layer did not go on that surface smoothly. Once the second layer is applied, that gap could create the actual coating to back away from the surface or just lift away from the surface itself.
These are very easily remedied with the cleaning of that board, or I should say the proper cleaning of that board.
Kevin Pawlowski:
Yeah, one thing just to mention, too, is the configuration of the de-wetting can really tell the story. I've seen that time and time again. I've seen coatings back away from taped areas, for example, where it points to adhesive that maybe has a little bit of silicone in it. I've seen fish eyes suggest particulates, so it could indicate maybe scoring, some contamination from the scoring, particulates from that. You could see around solder joints. If it's around solder joints, it could be an issue with the flux.
So, the position of the de-wetting of the defect can really tell the story. So, that's when you call someone like us. The first thing we're going to ask for is photos. It really, really paced to take photos of what you've got, your defect. So, when you bring it to us, bring it to Jon, bring it to Enrique, it really tells the story.
Common Defect: Delamination
Enrique Francis:
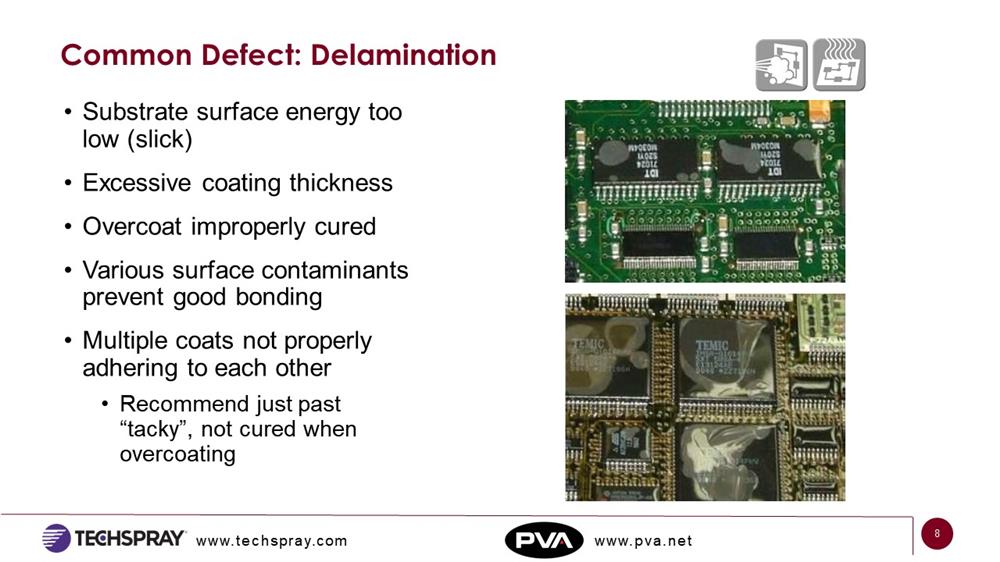
So, let's take a look at this particular slide. This particular slide is delamination. Here's where the coating is actually not adhering to the surface whatsoever. The coating itself has lifted from the surface. What it will happen is that the actual material appears to be speaking to the surface. However, the surface itself and the coating has never really created a good bond and that in itself can cause the coating to lift away.
Another cause of delamination is where you are applying an excessive amount of coating on the actual board itself. The excessive amount of coating can draw away from areas because of the fact of just the weight of the coating moving as it's starting to cure. If for example, the coating is not cured properly, there you can have lifting again because of the fact that the initial coating, it did not cure and it did not adhere to the surface. What happens there is that as the board goes through the oven, it'll start to lift away. Most often, you will find this when you have a great deal of contamination.
So, again, going back, various contaminants can cause delamination to the board. Most often contaminants that are not washed off or contaminants that may have gotten onto the board while handling, all of these can create an issue where the actual coating lifts away from the surface. As you can see on some of the slides, specifically the bottom left slide, it shows a white blemishing area where the coating has lifted away. That's a great representation of delamination.
Kevin Pawlowski:
Just one thing I want to point out is delamination, you can think of it as a cousin directly related to the previous slide, de-wetting. And so, the solution, the natural tendency when you have a de-wetting issue is to put it on thicker. So, let's say you've managed just by pure volume of coating to get it to lay across the surface. That doesn't mean it's sticking. And so then, that tends to lead to delamination.
So, just think of those as cousins and so it really could indicate the same problem. And so, you could even have a delamination and de-wetting happening at different times, pulling your hair out. It could very well be the same problem. So, something to keep in mind.
Common Defect: Non-Uniformity
Enrique Francis:
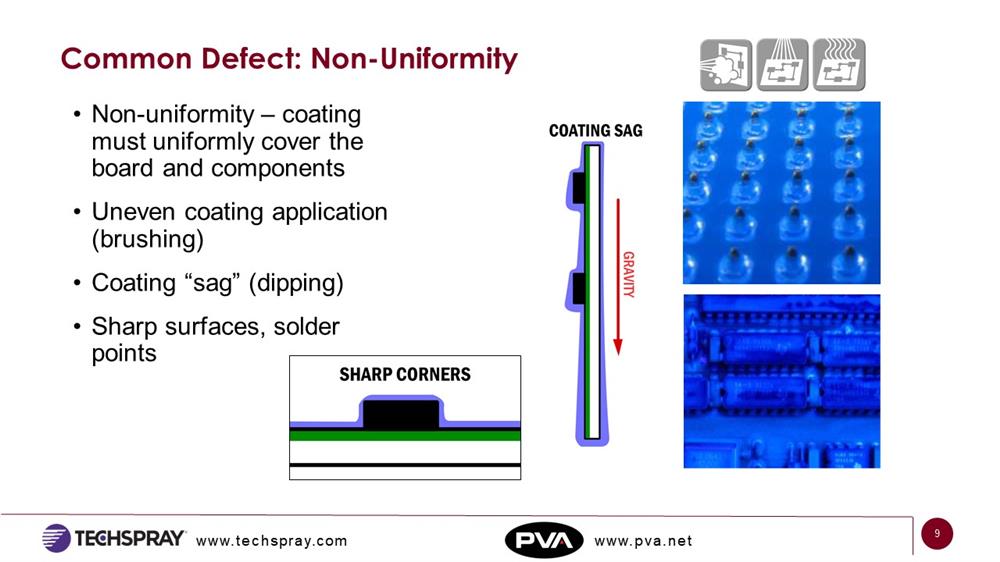
Okay, uniformity. Well, non-uniformity in particular, here's an area where the coating itself, and it depends on the type of application that you're working with in particular. For example, non-uniformity is where the coating is thicker on one end and thinner on another. That could be just the actual way that you're applying it.
For example, let's say you're spraying it. And your spray gun is a little too close to one area and as you move it across the actual board itself, you back away or you tend to go a little quicker than you should. Here, you would be applying uneven coating throughout the board because you're moving so quickly that you're not allowing the particulates of the coating to adhere on an even process. There in itself, you can have areas where, for example, the board has a high profile, a lot of high profile components.
Again, the uniformity can occur around the components themselves. As you could see in the center of that slide, you have one that is showing an actual sag. Well, again, as you're applying your coating to the board itself and you're applying it at such amount that it's actually puddling on the sides of the components themselves, there you could have a tremendous problem. Sagging can also easily occur in dipping processes where again, the high profile components can entrap some of that coating and not allow it to flow properly over the surface itself.
On the bottom left side of the slide, you will see an area that basically shows a component where the edges of that component has a much thinner coating than the other edges. And again, that is where the surface of the coating has moved away because of the sharp point creates such a downward drag that it allows the coating to only allow a very thin layer to occur.
These are things that could easily remedied by, one, slowing down. Don't speed up so quickly as you're trying to coat your surface. Another way is if, for example, if you are brushing, brush a little slower. Make sure that you cover all the areas evenly. In dipping the processes as you're pulling the board out of the coating itself, slow down and pull it out slower to allow the coating to fill in all the gaps. All of that would be very, very easily remedied by just taking a moment and slowing down your process so you can get an even coating going across the board completely.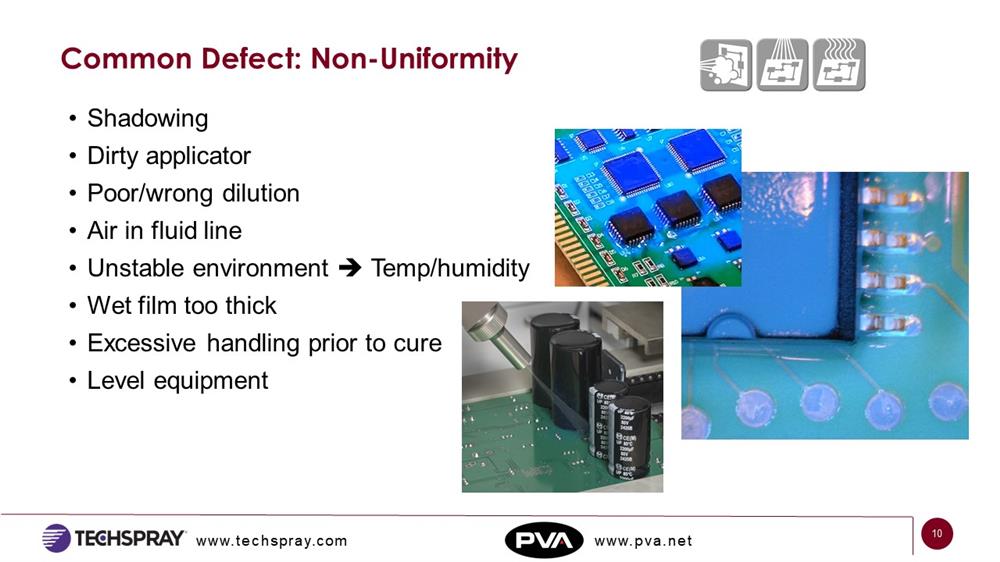
Jon Urquhart:
All right, thanks guys. I'll take this one now. When it comes to working with an automated coating system, you've got a lot of uniformity in the robot. You're going to move at a controlled speed, a controlled rate. It's highly programmable. But obviously issues can happen. So, like Enrique said, you want to make sure you have a consistent even coverage, consistent even speed. I've seen, as you had mentioned, if you're too close to the substrate, you can kind of pull and push the coating.
Other issues can happen just from the size of components, which can lead to shadowing where the shape or the size of a large component can prevent the coating from reaching all the areas, which can lead to some thinner spots. Maybe you're trying to coat that large component all around and maybe you're getting some overspray from around the spray pattern, going past that component. Things like that can easily be fixed by just making an adjustment to your coating program and focusing where the coating goes onto the component only.
Other things to look at, look at the applicator that you're using, the spray head or the nozzle or the air cap. Make sure it's clean. Utilize a solvent rest in your coating system so that when it's not in use, it keeps the nozzles clean and prevents any residue from getting built up on there.
Always pay attention to any maintenance and recommended rebuild by your equipment manufacturer as well. Always pay attention to any dilution that you're using if you're using a solvent-based coating, for example. Make sure you're using the proper dilution that fits what is recommended by your machine supplier.
Along those lines, when you set up a system, make sure you've purged out any air in the system as well. You don't want any bubbles or air pockets to collect, which can lead to some spits and spatters and inconsistent volumes being applied as well.
The environment that the coating process is in, whether it's in a factory, a separate room, whatever, you want to make sure that's a fairly stable temperature and/or humidity throughout the day. I've seen issues where you may have factory could be very cool in the morning, and then as the day goes on, the factory warms up and it gets warmer and warmer around the coating system or around the reservoirs, and that can lead to some changes in viscosity throughout the day, which can also lead to variations in output.
I've also seen where you may have the reservoirs next to maybe a wave solder line or an oven or another piece of equipment that may be giving off some heat, that can have an effect on it there. So, if you suspect you do have a temperature issue, talk with the machine people. Many suppliers have options for whether it's metering pumps, temperature control, fluid delivery, flow monitors, so on. There's a number of different tools that can be added to coating systems to ensure you're applying the right volumes every time and help avoid a lot of these issues.
Along those lines, one thing we mentioned a bit earlier was about thickness. Maybe you've got just too much coating on the substrate and that could lead again to the pooling, the buildup, dripping, so on. So, too much is not always a good thing.
And then, the other thing is what happens to the substrates after it's coated? Does it transfer from a conveyor through a inline curing oven or does an operator have to take it, transport it, and walk it over to a rack or a ventilated oven or a ventilated station? So, it's key to keep everything level and flat so that you don't risk the liquid coating falling or sliding or running to one side or the other.
Kevin Pawlowski:
I got a quick question. Just the dirty applicator kind of jumped out at me is the little solvent cup. Do you have a recommendation on how often you park the head, the nozzle into the cup to keep that clean or is that just when in between runs?
Jon Urquhart:
So, a lot of it is related to what sort of material you're using, how fast it might skin over. Again, if it's solvent based, what's the sort of evaporation rate? How fast will it skin? With your typical solvent-based acrylics and silicones and urethane, typically, if you're not running every 50 to 30 seconds, if there's a pause, then the machines have timers that it'll automatically go over and rest in that cup. Then when another substrate comes in, it'll automatically purge and it'll be ready to go.
Kevin Pawlowski:
Okay, excellent. One thing I did want to point out in terms of humidity, because I think, too, everybody can imagine, okay, temperature swings, the solvent's going to flash off faster. One thing from our side is why the humidity is so important is most of these coatings, these resins are humidity activated, so it starts the coating cure process.
And so, if you're in a high humidity environment, or I've had complaints from Houston in the spring before the air systems are really kicking on a regular basis because higher humidity, so it's acting differently. Low humidity, it may have trouble curing, but it's not going to be an application problem. It'd be more on the cure side. So, just kind of give you a point in terms of that. Enrique, it's back to you.
Common Defect: Voids or Bubbles
Enrique Francis:
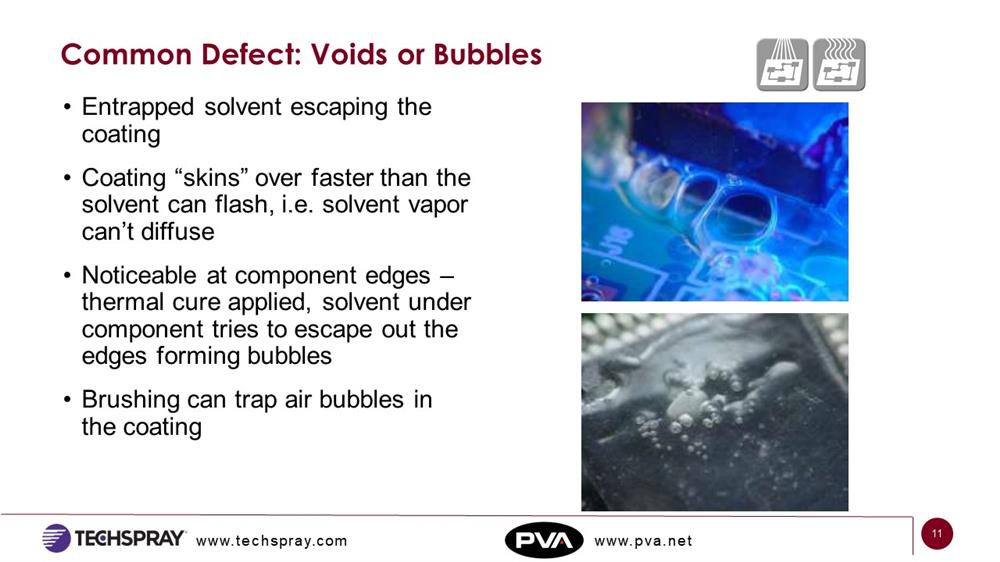
Thank you. Here's an area where most often the defect is created either by a spray application where you're spraying it so quickly and you're applying such a level of coating that you can entrap some of the solvent from it actually coming out of the coating itself. What can happen is something as simple as an adjustment of slowing the machine down or slowing your hands down will allow the coating to allow the solvent that's trying to evaporate from getting out of the actual coating itself. The layer of coating can and trap some solvents which can create bubbles.
Now, these bubbles can occur in many, many different ways. In particular, if the solvent migrates underneath a component and as it starts to cure, that solvent comes back out, it could create a bubble as you could see on the slide right in front of you. That bubble in itself, it creates a major defect where you actually have a bubble and no coating whatsoever underneath. That can cause something to break. The bubble itself can burst in the oven, leaving you an empty gap.
So, that's an area where you need to really look at the way that you're reducing viscosity. If you are having to take and lower the viscosity of that particular coating to a level where you can apply it, you can over-reduce it where you are applying so much solvent that the actual coating, it becomes much thinner. That can create bubbles. It could create voids where again, the coating isn't even there.
An area that really has to be looked at thoroughly is the recommendation of the actual coating manufacturer telling you where that particular product, what viscosity that particular product should be applied at. That will make a big difference in how the actual coating adheres to the surface or whether it'll go ahead and possibly get underneath a component. So, make sure that you truly look at those recommendations and try to adhere to them as much as possible.
If the coating itself, for example, has some type of a humidity-activated system, what can happen is if the humidity is way too high, you can get a blemishing effect where the coating itself will look kind of a whitish effect on the surface of that coating. That's where the actual coating itself has already set up, and you have entrap solvent underneath it and it's trying to evaporate out. That can create, again, bubbles, which is not something that you would want.
Or another area, as I mentioned earlier, is if it gets underneath a component. Now, most often when people are applying using a spray gun, what happens there is that they tend to overdilute the product in itself, and that causes it to be very runny. So, they're overcompensating for it by adding multiple passes and again, entrapping some of the solvents that are within layers. That can cause you some major problems.
And then finally, if you're doing a different application, for example, if you're brushing, if anybody has ever painted a wall and have moved very quickly across that wall with your paintbrush, you can see bubbles automatically forming on that surface. This can happen as well in a spray application where you are moving over that surface so quickly that it's literally applying the coatings very, very fast. The bubbles themselves can be created by maybe you're applying too much air in that system and it's creating that defect.
So, be aware of those and be aware of the fact that, again, looking at the recommendation that the manufacturer has given you for that coating is vital.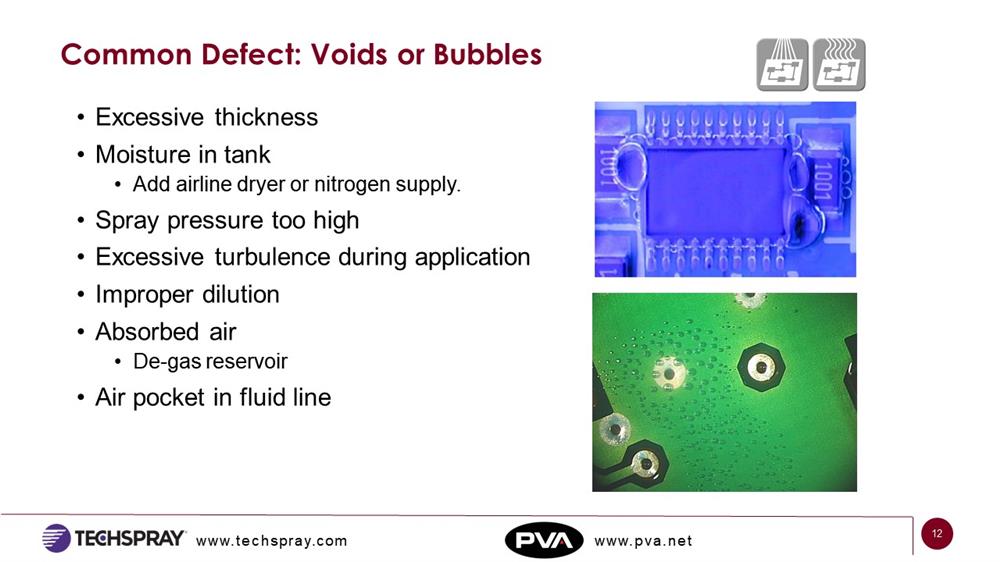
Jon Urquhart:
Yeah, good stuff. So, even in a robotic application, same thing, bubbles can occur. Again, thickness, we touched on that quite a bit, and you're going to see that mentioned probably quite a few times throughout here. Thickness is key, so pay attention to that. Spraying pressure, Enrique touched on that a bit. If you're using, say, an atomized sprayer and you're using a lot of atomizing air or too high fluid pressure, you're creating a lot of turbulence, same thing. You're kind of turning the coating over on itself and potentially trapping some air pockets inside there.
Some other things look at how dry the air is coming in to your reservoir. So, what this can lead to is if you have moisture in your lines, the moisture gets trapped inside the reservoir and kind of gets impregnated into the coating itself, which then you may not see until later on after you apply the coating and wait for a few minutes and you'll see that these bubbles start forming out of nowhere. And so, that's a pretty strong culprit there as well.
Dilution as well. Again, pay attention to the proper dilution that's called out for your applicator. Something not to be confused with the moisture issue is having air or gas absorbed into the coating. This can happen whether you're using dry air or a nitrogen supply. Really, if you're over-pressurizing a reservoir too high, too much pressure for too long, and coating can kind of absorb the gas over time.
So, it's always recommended to bleed the pressure from your supply tanks if the system's down for extended periods of time, if it's overnight over weekend, shut down, whatever. And then it's always recommended to use a clean, dry supply air, whether you need to add an inline air dryer or a nitrogen supply. And then finally, again, pay attention to if there's any air and fluid system, make sure it's purged out and you have a good clean, consistent flow of fluid to your applicators.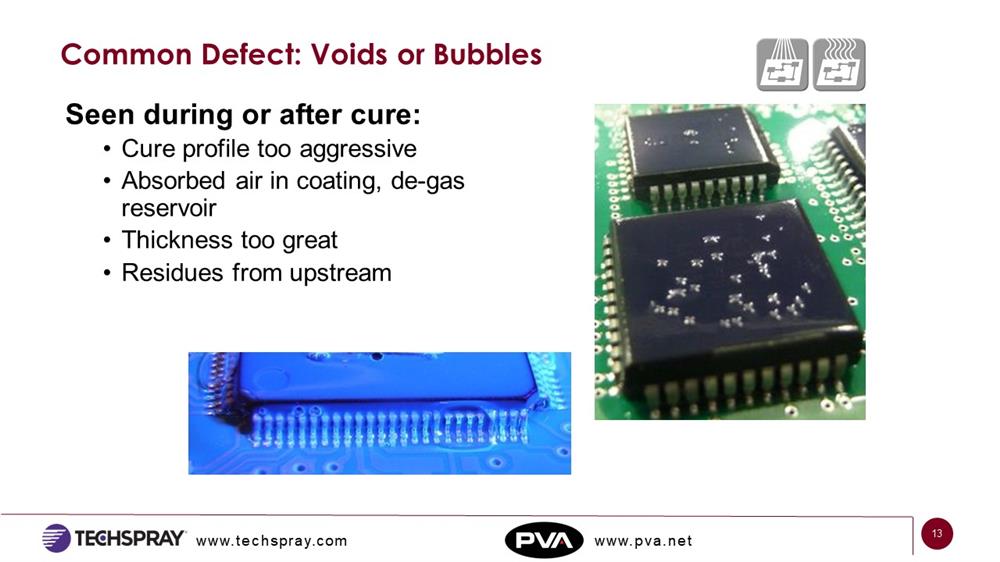
All right, so some of these images here pertain to what you might see after a curing step. And a lot of times, really pay attention to your cure profile or you're going too hot, too fast. If you see the image on the right where you see kind of bubbles everywhere on components and everything else, and even under components, then it might simply be it's just too hot, too soon. So, use a more gradual ramped temperature.
If you see bubbles everywhere, and even if you're not going through a forced cure step, then you've most likely got absorbed there in the coating. So, you want to degas your reservoir and just vent the pressure and let the coating relax for a bit.
Thickness can have an issue, too. Too much coating around a lot of lead components can lead to that as well. And then in some cases, I've seen, not very often, but I've actually seen it happens, some upstream residues will react or can react underneath some components and lead to some bubbles because it creates a weird reaction during the cure process.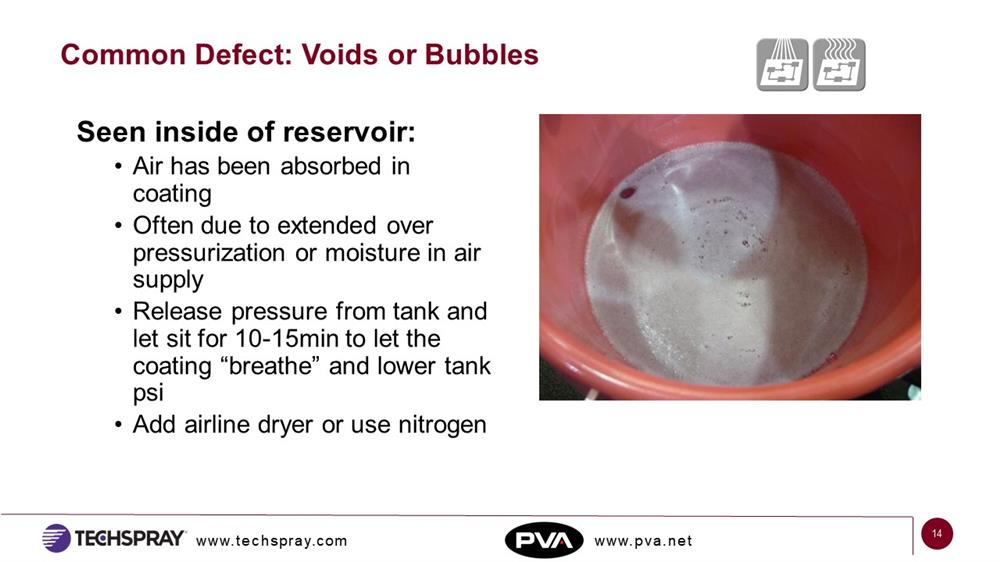
And going back a little bit to not so much the moisture issue, but again, absorbed air issue, I wanted to point this out. This is a good example of what happens if you have a lot of absorbed air or gas inside a reservoir. This was a coating that's been under pressure for too long. Most times, you only need about anywhere from 10 to 20, 10 to 30 PSI. And some people, like I say, more is not always better. They might want to run it up to like 50 PSI, 60 PSI. It's not really recommended in most cases. And especially if you're not bleeding off pressure to the tanks, you can get something like this.
So, what's recommended is bleed pressure to the tank. Even remove the lid for a minute if you have to, or just remove it off to the side. And what you see is this. And it looks like beer foam and essentially, it's the gas just coming out of the coating because it's relaxing and breathing.
Common Defect: Cracks
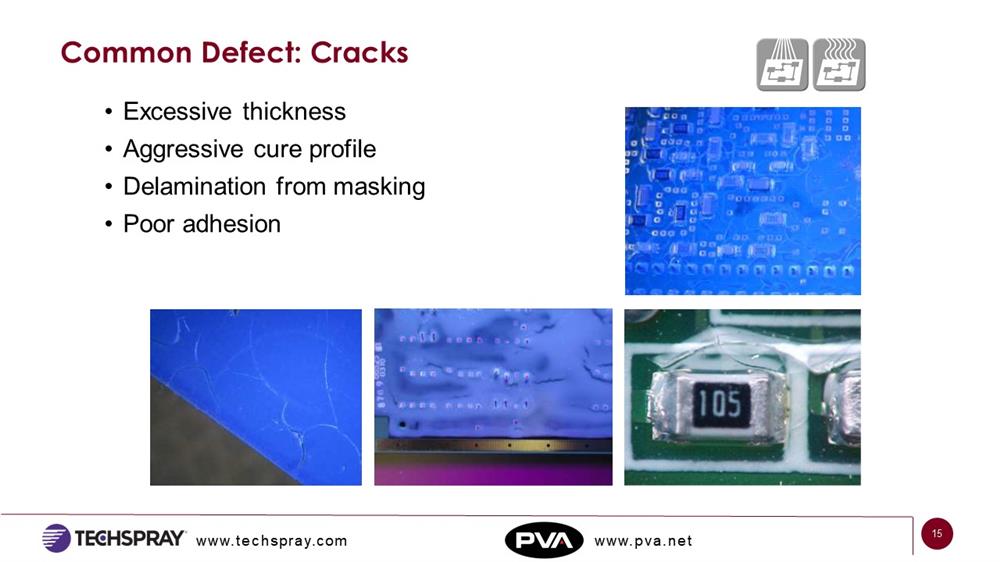
All right, cracking. So, again, pay attention to your thickness. Too much and during cure cycle, if you have, I've seen some with very aggressive solvents, very fast evaporating solvents, MEK type products, tiling type products that with very high percentage load or very high percentage thin and they cure too fast, then I've seen cracks if it's applied way too thick. So, again, pay attention to that.
I've also seen cracking happen almost in conjunction with a delamination due to a demasking operation. So, if you're using a tape mask or using a liquid mask or something like that, pay attention to how you demask the substrate. Use a more gentle removal of the mask. Maybe don't let the coating cure completely so it's completely tack free maybe. So, it's still a little bit tacky so that you can pull the mask off without causing any stress on the coating itself and leading to a crack and delamination. And same thing, it could also have something to do with the adhesion as well. Again, kind of go hand in hand with the adhesion and delamination.
Common Defect: Orange Peel / Ripples
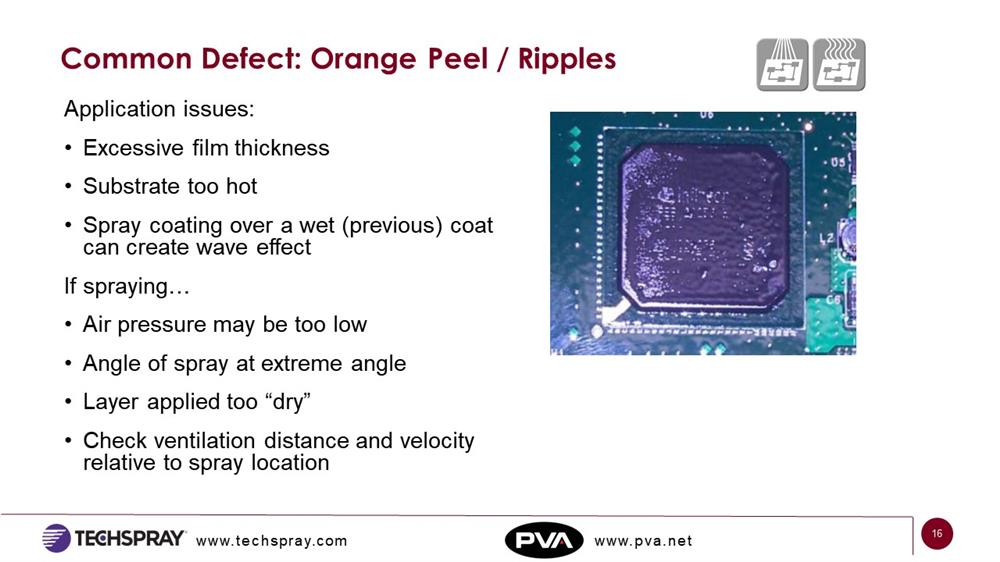
All right, so orange peel. Orange peel is think of a lake on a windy day and it kind of stays like that all over your board. I'm going to say it again. Pay attention to your film thickness. If you're putting too much wet coating down, maybe the applicator is too close to the substrate and you're creating this turbulence, that can have an effect as well.
I've seen in some cases where people prefer to coat their substrate when it's warm to help maybe flash off or cross-link the coating a little bit quicker, pay attention to what that temperature is. If it's too hot, I've seen it creates some weird stresses on the polymers inside there, which can lead to some wrinkling. So, obviously, don't coat a board that's way too hot out of an oven, for example. Give it a time to get a little bit closer to room temperature before you coat it.
If people are doing a multilayer coating, maybe they need an excessive thickness or they're trying to just do a multilayer type pass to get coverage on all angles of a component, where you're doing multiple wet layers, it's always good to let the prior layer of coating cure a little bit. Well, not completely cure. You're just kind letting it kind of stabilize and become a little bit tacky still. And then, apply the other coating over it to let the two layers kind of meld together.
If you're doing a spraying process, so if you're using an atomized sprayer, check to make sure you're using the right atomizing pressure. Make sure you're not either spraying it too high or too low. Too high pressure, you kind of create this excess turbulence and it kind of again, rolls over itself and creates those waves. Too low pressure and maybe doesn't have enough force behind it to let it force it to wet out nicely. So, again, talk with your machine manufacturer, understand what settings you need to apply your coating.
In some cases, if you've got a lot of topography and you've got to spray at some angles, I always say try not to spray usually beyond say 45 degrees, for example. If you're doing a real extreme angle of the spray heads of the board, try not to overdo it because again, you're kind of forcing the coating to roll over itself as it's moving across the board surface.
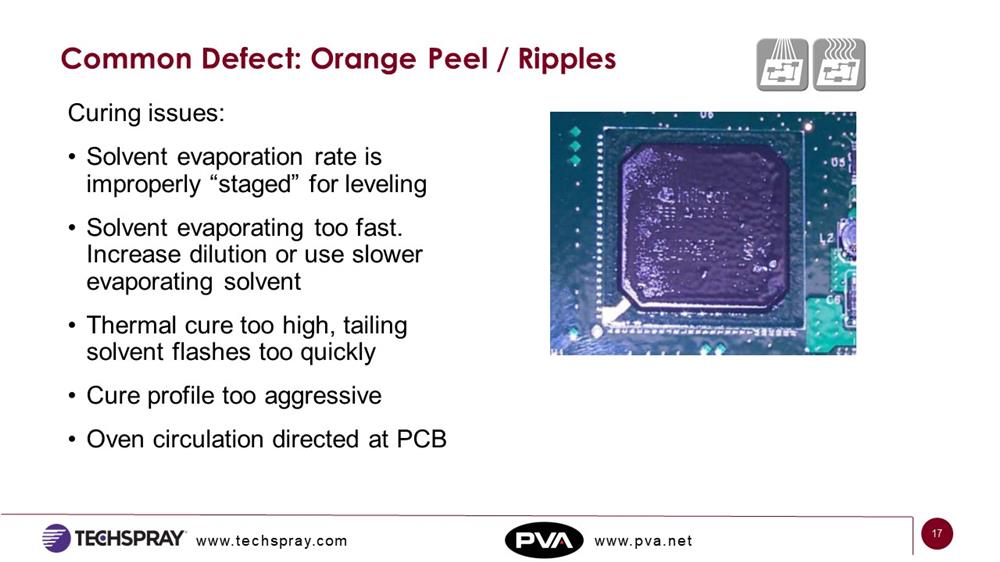
Pay attention to your cure profile again. And other things I've seen is air circulation, whether it's in the oven or if you've got a ventilated chamber or ventilated queue, pay attention to where that venting source is and how close and how much air is traveling over the substrate in that area. If you're pulling a lot of air over the substrate as it's curing, then you may have to add a baffle or something to prevent that from happening and direct the airflow away from there.
Defect Prevention: Equipment
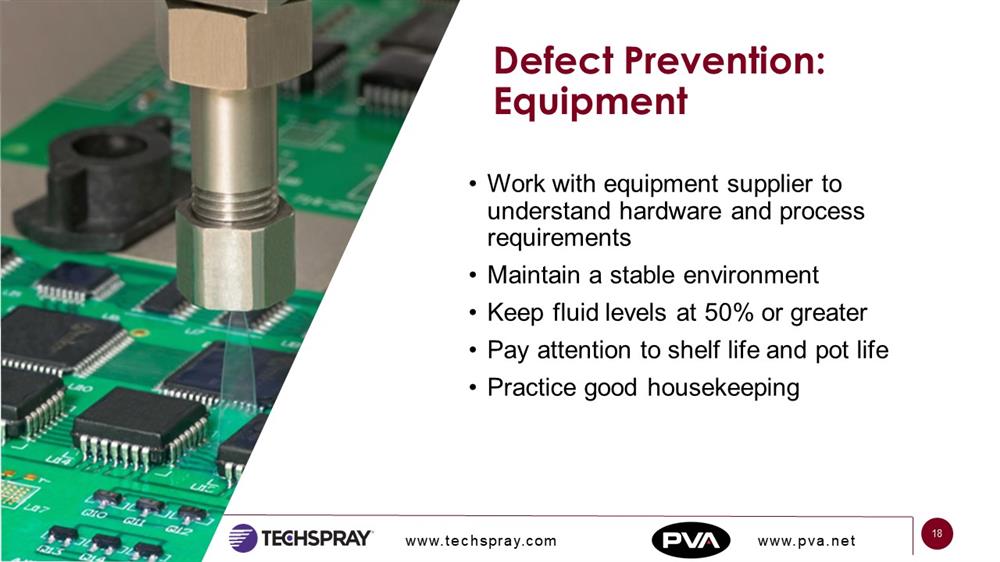
All right, so to help prevent a lot of these things from happening, stay in touch with your equipment supplier. Reach out, even if you don't have an issue, maybe you're just asking about how to run a new coating. Maybe you're curious to know if you're using the right settings, maybe the right cure profiles, talk with your material supplier as well. You want to make sure you understand the proper settings for the equipment. We generate a lot of profiles for all of our applicators, so we can give you a lot of starting settings to use for most, any coating that's out there.
Again, maintain a stable environment, temperature control, humidity control. If not, talk with your machine supplier to understand what tools are offered to maintain proper flow rates, proper temperature control, flow monitoring, so on.
We always recommend keeping your fluid levels at 50% or greater in your pressure pots. That's just to eliminate the risk of maybe drawing an air pocket into a dip tube, for example. Always pay attention to obviously the pot life and shelf life of the coatings to ensure you're using fresh products every time. And then simply, just maintain good housekeeping practices. Keep the applicators clean, make sure you perform normal preventative maintenance on the machines itself, rebuild kits, so on. Keep the areas clean, dust free. Keep the nozzles clean, so on.
Defect Prevention: Nozzle Selection
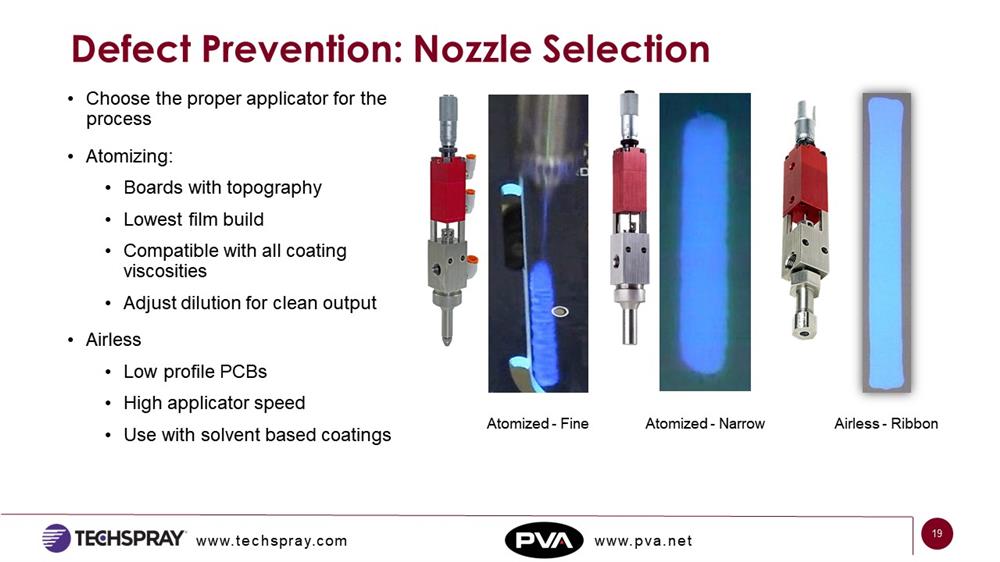
And then along that line, when it comes to the nozzles, again, this'll happen when you talk with your equipment supplier about what applicator do I need for the job? Do I need a fine or medium pattern atomized sprayer? Or do I need to use an airless applicator, so I've got a lot of low profile substrates?
So, with atomizing heads, they're very good for substrates that have a lot of dense components, a lot of tall and small components. Maybe it's mixed technology, large components you need to get around. Maybe you've got a lot of three-dimensional services. That's where atomizing really, really works well. Atomizing will help you achieve the lowest film thickness you need of any coating that's out there. It's also the most versatile type of technology for applying liquid coatings. You can apply very low viscosity to very high viscosity conformal coatings.
If you're using a solvent-based product, typically you'd adjust your dilution just to provide a clean spray pattern from atomized head. If you're using an airless applicator and you're doing a lot of low profile surface mount type technology boards where it puts out just a liquid stripe of coating, then you've got to pay close attention to viscosity of the coating. Typically, 65, 75 centipoise is kind of the sweet spot for those types of applicators. These use a much higher applicator speed because it puts out such a large volume of coating.
And then, pay attention to if you see any sort of splashing or anything like that, that can actually happen from some of the higher applicator speeds, whether it is an atomized or an airless. So, work with your machine supplier and they will help guide you down the right path to choose the right applicator.
Defect Prevention: Keep-out Areas
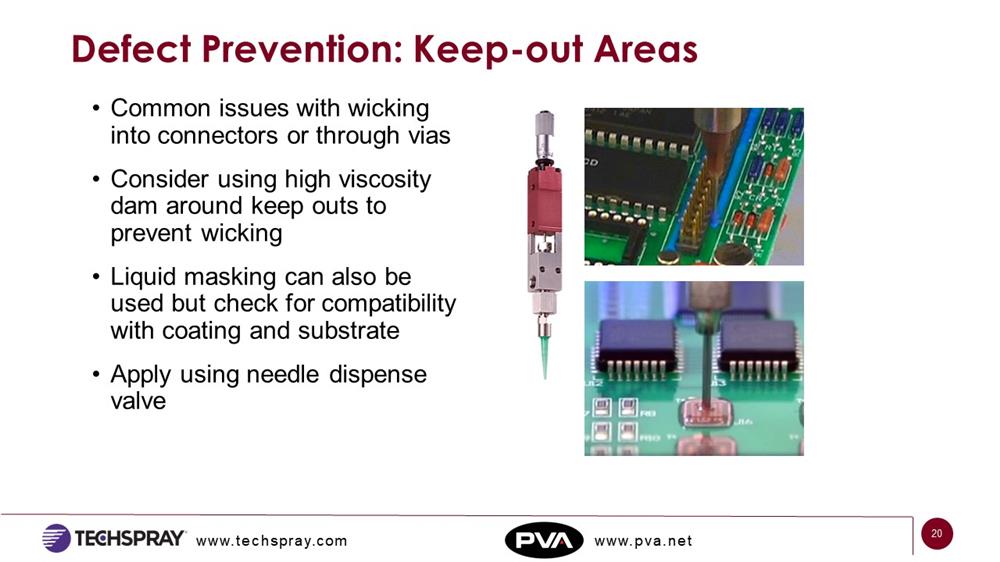
And when we're talking about conformable coating, we always try to approach this as a selective process. We're trying to do this without masking minimal handling. And sometimes, it's not always achievable without adding some other step or feature. So, a lot of times, you might have issues with wicking into connectors or open vias. So, in that case, take a look and see if you are coating supplier or if you have another product that you're familiar with that's got a higher viscosity that's compatible with the process, use that as a gel or dam around these sensitive areas.
Liquid masking can be applied as well if you're trying to maybe protect a test point or a ground plane or some area that can't be selectively coated somehow. And then, these are all easily dispensed with needle dispense valves, typically within the same machine or depending on throughput, can be broken out into a separate process in the line.
Defect Prevention: Coating Prep
Enrique Francis:
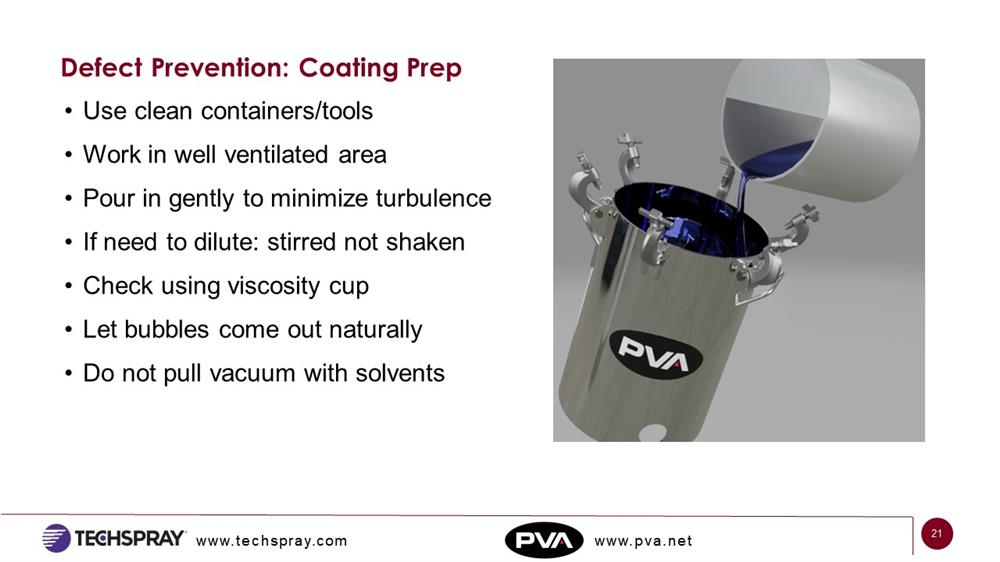
So, as Jon had mentioned, housekeeping is vital. If you have dirty equipment, you will encounter many defects in itself. The best thing to do is keep your tools and your containers as clean as possible. For worker safety, make sure that you're in a well-ventilated area to make sure you're not inhaling all the fumes that the application can occur.
Make sure that when you're adding to your reservoir, you're not pouring it in with such high turbulence in the process that you're building and you're literally sucking air in into the actual coating itself. This again, as we spoke with before, can create bubbles. It can create failures in the coating, adhering to a surface. So, make sure that and the process you're pouring slowly.
Obviously, viscosity is vital when you're applying coating. So, make sure that the viscosity is at the right setting that is recommended by your supplier. Make sure that you use a viscosity cup to check those viscosity points to make sure that they are in their proper range. Give some time to the bubbles that may have been incorporated in the reservoir and allow them to bubble out prior to closing that.
What I will definitely tell you is do not pull a vacuum trying to pull those bubbles out because in the process, you may pull some of the solvents that are within the coating itself and create, again, additional issues further down the road. So, make sure that you don't do it in that manner. These are just minor, but again, it's something that you should do.
Defect Prevention: Thickness Check
Jon Urquhart:
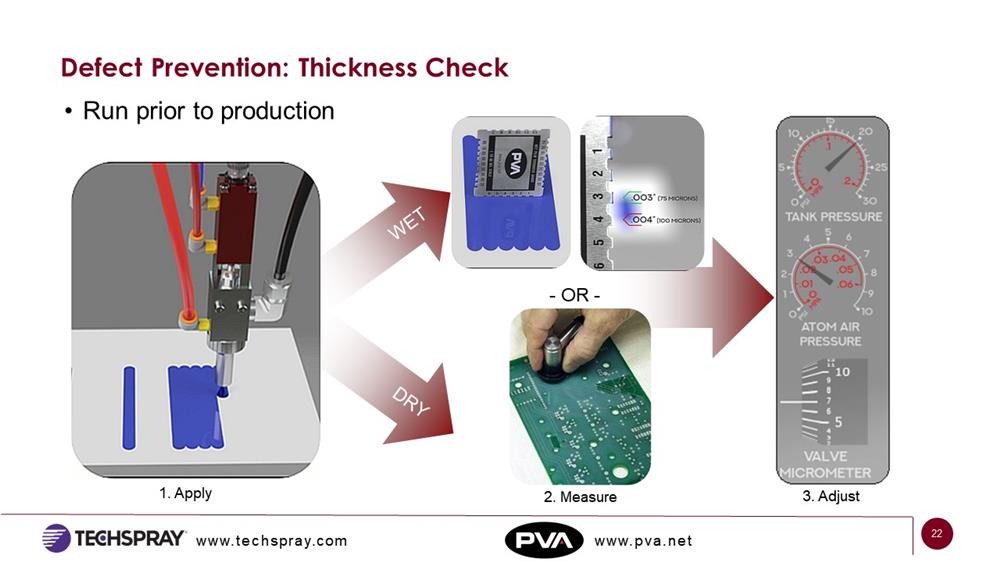
So, you probably remember earlier, and we talked about and mentioned excessive thickness quite extensively. So, here's a simple check you can do typically in the beginning of production, maybe if you want to do a simple characterization of the system or a new material or the applicator.
What this simply involves is take a bare circuit board, take a metal plate that's clean and flat. You can even use glass. We've used even coated card stock and simply, you're applying a sprayed area onto that substrate using the parameters you are either currently using with your production process or run your production program on that flat substrate. And once you do that, then you can choose to do a thickness measurement of the coating, whether it's wet or dry, choose to do it wet. You can use a low cost wet thickness gauge. It's essentially a calibrated comb that you dip into the wet coating.
And when you remove it, you can see which of the teeth have coating on them, which can then tell you you have so much coating and not ... An example here, it shows you have 3000s of coating, but not quite 4,000. So, if that's in range, you're good to go. If you choose to check your thickness when it's dry, then you can use something like any current meter or ultrasonic gauges. But you also want to make sure the coating is very well dried and cured so that you don't have any tacky or soft spots. You get an accurate measurement.
If you find that something's a little bit out of whack, you make an adjustment, whether it's adjust your flow rate, stroke setting, robot speed, whatever, and then run the check again and then you should be good to go. Again, reach out to your equipment suppliers and they'll help you walk through all this.
Kevin Pawlowski:
Yeah, while we're talking about thickness, one thing I want to point out is when a customer might be initially qualifying the thickness thereafter, it's common to start with the dry thickness thereafter, use a calculation with the solids of the coating you're using and apply that wet coating. The problem is, is that wet coating, it may not be able to get there. You may not be able to apply it that thick. It may take two or three passes. So, if you're in its speed, everything's speed, efficiency, I want to push it through with one pass. There's trade-offs with that.
And a lot of the defects we've talked about can be caused by trying to lay too much all at one time too fast, cranking up the heat so you're curing that big, thick coating. All of these things that can be caused by a compensation of maybe the coating isn't the right solids content. You need to talk to your coating manufacturer for a higher viscosity model. So, there's different conversations that can be had to really make the rest of your process easier and to avoid some of these defects we're talking about.
Defect Prevention: Curing Process
Jon Urquhart:
All right, last but not least, in an automated process, one of the last things you're going to go through is the curing step. So, if you're using a force cure method, whether you use a heating oven, UV, whatever, typically today, we're mostly talking about a lot of solvent-based or heat cure type products.
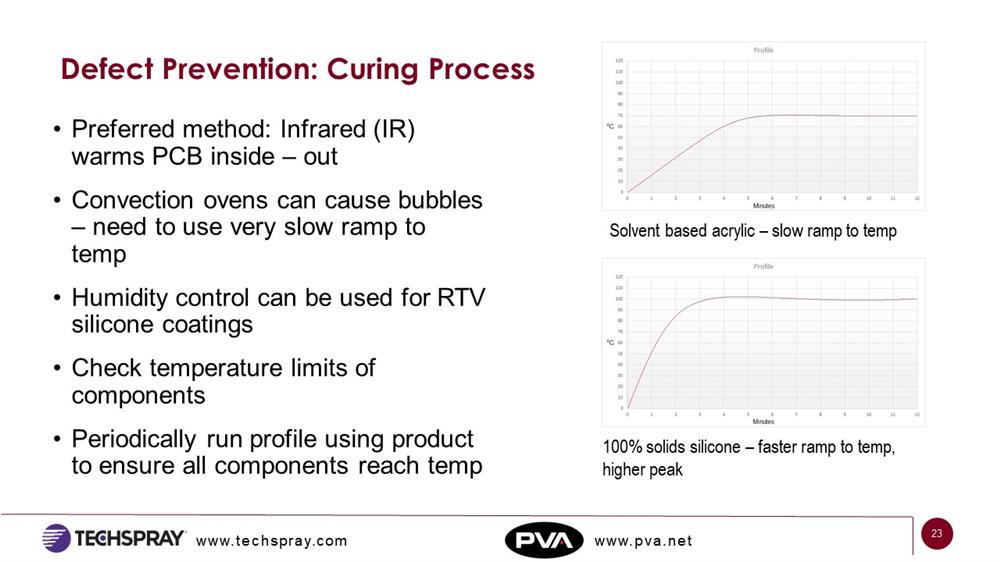
Our preferred method is to use an IR or infrared oven. Essentially, you're warming the substrate from the inside out versus a convection oven where you're warming the air around it. Now to be clear, convection ovens work perfectly well, but you've got to be careful on how fast you ramp the temperature, how much airflow is in there. Again, I mentioned the rippling effect. Some convection elements have a lot of airflow running through there, so pay attention to where some of the airflow jets are directed.
Again, pay attention to your profiles. If you see on the right side, I've got two examples of different profiles. Solvent-based acrylic has a very slow and gradual ramp up to its max curing temp. Typically, on average somewhere around 65, 70 C. In other cases, you've got say 100% solids, heat cure silicone, for example, then you could have a much faster ramp to temp, which is typically higher. But again, that doesn't mean that may work for your substrate. If you start seeing bubbles and other things happening, then you may have to slow down that ramp to temperature anyway. So, pay attention to what your max temps are.
And then also, pay attention to what are the max temps that your components can handle. You don't want a pile of mush coming out the other side of your oven. So, it's always good to periodically run a check with your system as well to make sure that your boards are reaching temp. It's good to use a production level board, if that's not available, if you have a scrap board, something that's a close representative to your production products so that you know exactly what you're dealing with and understand thermal mass and understand what temperature profiles will work for your process.
Cleaning PCB Before Coating

Enrique Francis:
Interesting. This is out of place, I believe. But again, this is a cleaning issue. If again, you're looking at you're getting a defect such as fish eye, make sure that the coating is, or I should say that the board is actually clean. If you're experiencing things like de-wetting, again, that's another defect that can create an area where the actual coating is not wetting out the surface.
The number one thing here to prevent this would be cleaning the board properly. Fluxes can absorb a lot of moisture and then in the oven itself, they can cause the moisture to be admitted back in and around the coating itself, causing some of that to be lifting. It could, down the road, create corrosion.
Every PC board, whether it's a no clean board or a regular RMH board, all of them should be cleaned to prevent any of the contaminants that may be on that board to be removed prior to applying a coating. As you know, conformal coating covers the surface, so if the surface has an imperfection on it, that will be covered by the coating and again, you could lose adhesion, you could create bubbles, you could create de-wetting. All of those things can occur. So, the easiest way to avoid all of that would be to wash the board properly with the proper chemicals to remove all those excess residues that are on there.
Releasing agents are another form of contaminants that can be on a board easily by just handling. The fact that an operator isn't washing, or I should say isn't wearing gloves, that could transfer some of those defects and some of the soils back onto that board, so be aware of that. The worst one in particular would be your silicone contamination, which can create fish eyes across the board.
Kevin Pawlowski:
Yeah. One way to look at it is, it's not all about flux. If you're not cleaning your board, everything that happened to that board before the coating process can be a source of contamination. So, if you're not cleaning the board, you're putting a lot of trust in your bare board manufacturer, all the handling, how it's stored, the boards are stored mid process, your component manufacturers, because there could be different release compounds and such on the components themselves.
You're counting on all that being right. And it can be a big chemistry experiment if there's a lot of contamination on that board. So, something to keep in mind.
Now, the issue of no clean fluxes, okay, I'm not going to get into that in detail, but there is a nice article on the Techspray website on that specific issue. There's been some new studies on that, reported on that, and so I'll be along with the recording of this, you'll get a link to that as well.
Now, we do have a few questions. Sorry, I was a little late. I didn't notice that there was a chat and a Q&A. I do that every time. We've got one that's, what about surface tension, poor adhesion. And that's really what we're talking about with cleaning is it's very much usually a contamination issue. There's something between the circuit board and that coating that's not working and that's lowering the surface tension, and so you get that water on a wax car kind of effect. And so, that can lead to adhesion problems or de-wetting problems, okay, delamination.
This next one, Jon, I'll leave this to you because I'll go ahead and let's knock off some of these questions. Is it recommended to use the gauge or measure thickness equipment when the application is using a needle valve and is over one millimeter?
Jon Urquhart:
So, if you're trying to do a very thick application, there are gauges that go much higher, although I don't know where they will cap out. At that point, if you've got a one-millimeter thick layer of something, whether it's encapsulant or something else, then you can almost use a digital caliper at that point. Let the product cure and then measure it using something like that. But there are a wide range of gauges that you can use to measure wet as well. So, check with the supplier and see if they have something they would recommend for that.
Kevin Pawlowski:
Excellent. I'm going to change the slide, but I've got one more question. Is vacuum acceptable to reduce bubbles that are present after spray coating, Arathane 5750 thinned with toluene to hand spray immediately after spray or when toluene has flashed off? So, do you have any experience with that, Jon?
Jon Urquhart:
I would typically say no. Maybe try and use a slightly slower evaporating solvent. I can't remember if you can use xylene with that particular product, which has got a slower evaporating rate than toluene does, that may be a little more favorable for what you're trying to do. The toluene might be a little too aggressive in how fast it flashes off, which could be something to do with it.
Again, pay attention to what's the environment that you're doing this in? Is it hot? Is it cool? Is it humid? So, on. So, look at all those things. But typically, maybe try either a hair more of toluene or switch to something that's a little bit slower evaporating as your thinner.
Kevin Pawlowski:
Okay. Thanks, Jon. Well, that gets us through the questions. Of course, feel free to type in more or even better, reach out to us. You've got our contact information. You don't have to solve these defects by yourself. You've got your equipment manufacturers. You've got your coating manufacturers. So, we're here to help you guys.
And so, coating defects, a lot of times, lack of cleaning and application and coating issues and those kind of segments help us diagnose what's going on. The location of the defect and tell a story, and remember, photos really help us out. So, if you've got a problem you need us to help you with, please take some photos, get them out to us along with your email, and that would help a lot.
Cleaning reduces a lot of problems. I mean, if you want to open up your process window dialing in your thickness of the coating you're applying to a reasonable level and cleaning is going to really open up your process window and reduce your defects. Other things can go wrong and you still got a wonderful coating if you can just kind of get some of that under control. So, again, work with a coating formulator and your equipment manufacturer.
One thing, a little plug here that at Techspray at ITW, we do have a full service qualification in product development lab. And so, on the coating side, we certainly can help you through these issues or if you're setting up a new coating align or trying to spec in a new material, we can help with that process. You see right in the middle of that shot, Jon, you recognize that piece of equipment?
Jon Urquhart:
I do.
Kevin Pawlowski:
... is a PVA, so we can actually coat inhouse for the qualification process. So, we do have hands-on experience with this. I do have a final question. Share this presentation. Absolutely. You guys will be getting a recording of this presentation quickly. And then it will be, so in about immediately, I'll share the rough cut. And then within a couple of days you'll get the rough cut plus a transcript. So, you'll have all this information in a very digestible way, depending on how you want to do it, share it within your department, within your company.
So, it doesn't look like there are any other questions, but again, I just want to stress, reach out to us if you do have any questions. Just going to reiterate, go back a slide. There's our contact information and thank you. So, appreciate you all attending today and you have a good day. Thanks.