Contents:
- How Does Ultrasonic Cleaning Work?
- Ultrasonic Cleaning Safety
- Ultrasonic Equipment Controls
- Initial Set-up of Ultrasonic Cleaning Equipment
- Importance of Final Rinse for Ultrasonic Cleaning
How Does Ultrasonic Cleaning Work?
These units have built in transducers that will transmit sonic waves at various frequencies. When you are buying a model or looking at purchasing one, you need to get with the equipment manufacturer and explain what you're cleaning, how you're cleaning it, what you're cleaning with. They can help you choose the size of transducer for the equipment that you would be purchasing.
So, the way this works, you have a solvent inside here.
And that transducer will transmit sonic waves that are particular frequency. This is 40 kilohertz in this unit right here. And as those waves go through and hit your part, the waves, the solvent or whatever you're using in there will absorb that energy from the sonic waves.
And what that does is that loosens the molecular cohesive forces and it forms a void in there. And, as that void absorbs more energy, it grows and grows until eventually it collapses on itself. It's called implosion. And at the moment of implosion, there's so much pressure and heat that is released in little microscopic areas because of all these voids or bubbles that are in there.
And, those intense little points of heat and pressure is what helps clean along with the solvent action of it. That's usually with your lower frequency transducers.
As you increase your transducer frequency with the different units, those higher frequencies, even though you still have those implosions, those go less and less, and they start transitioning into what they call acoustic streaming. And, so rather than the implosions, it's back and forth actions, it's almost like a little micro scrubbing action. And, that's where you want to use those with your more delicate parts. Your very intricately, machined parts and areas that you have to get into to get all the little nooks and crannies clean. The higher frequencies are generally for your sensitive components and for your more precision cleaning.
Any additional heat input will make it easier to clean that part, just because of surface tension, lowers of your solvent or your mixtures. And it just makes it easier to clean.
Ultrasonic Cleaning Safety
Now that said, you have to be very careful about applying heat to some solvents because they do obviously release vapors. There can be a flashpoint involved. So, really know what you're doing and understand the solvent. If you're using a flammable solvent or something that is combustible we recommended never, never, never applying any additional heat, because the material will get warm on its own just from the ultrasonic action. So, be extremely careful with that. If you're using aqueous solutions then obviously that's not an issue.
Ultrasonic Equipment Controls
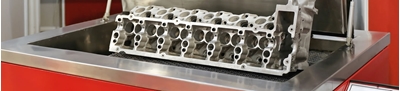
But, they're all adjustable. You can adjust time input, your temperature input and also this as a separate de-gassing unit. Now, what de-gassing does and especially if you're using solvent mixes, it allows that that solvent to de-gas any entrained vapors that are may have absorbed. And it just equilibrates it. So, even if it doesn't have a separate setting allow it to run a few minutes to completely de-gas before you enter the part. Now, on this particular unit and almost any particular unit, you've got your solvent mixture or your aqueous mixture in here, this is the cleaning bath where all of the cleaning is taking place.
It can be directly where you put your parts in this bath, or what many people do, especially with smaller parts, is they'll do what they call an indirect method or what's also considered as a double boiler. So, you have a pan inside of a pan, and you'll put your small parts in a beaker with your actual solvent, but your bath is filled with water.
Initial Set-up of Ultrasonic Cleaning Equipment
We'll set our time for five minutes. Now we'll have our temperature set. Right now it's at 25°, but we're going to set it at 43° C and then the de-gas on this particular unit. We always leave it at one. Now, in this particular case, we're going to do the indirect method rather than dropping a small part in the large bath. So, we've got our solving here in the beaker, going to introduce the part into the beaker. So, now it's there, turn this on and it's going.
Importance of Final Rinse for Ultrasonic Cleaning
So, it's running and we'll just introduce this, put the part into there. Now we'll put our lid on, and then it'll count down the time.
So if you're running parts over and over in the same solvent, it may get it clean, but then you're dragging it right back up through dirty solvent as you remove the part. So, we always recommend a separate final rinse after you removed the part with the same cleaning material that you're using in your unit.
We'll turn this unit off and we'll stop the cycle and we'll remove the part. Obviously let it cool for a moment.
So, all we're doing here is we're going to take a little bit of the same IPA and then just rinse the unit. And, then there are various drying methods. You can either just let it set out and flash off at room temperature, or if available, you can put it in a lab oven and accelerate that drawing time with the heat from the oven.
So, obviously this was a short and sweet demonstration here, but if you have any questions at all about general operation of an ultrasonic unit, some of the products that may be used that we carry, that can be used in the ultrasonic.
Any types or process that we can help describe for you or help you set up, please get in touch with us here at ITW.
For more information on ultrasonic cleaning, see our article Guide to Solvent and Water-based Ultrasonic Cleaning.